I needed to update the connection strings on several Azure Web Apps and Azure Functions. This turned out being harder than I expected because of the way Azure expect hashtables and it removes connection strings not included. I set out to create a re-usable function that I can use to change these connection strings easily. Below is my PowerShell function and how to use it.
When using PowerShell to update these, PowerShell overwrites all connection strings with the new list. Because of this, you need to grab the current connection strings first. When using this function, you pass the current connection strings to it, the new connection strings and it will take it from there.
The function will create a Hashtable (which is how Azure requires it to be passed to the API) of all the old connection strings. From there, it will take your hastable of new connection strings and add or overwrite any old ones.
Use this script at your own risk! Remember updating environment variables and connection strings does restart the app instantly!
function Add-ConnectionStrings {
    param(
        $currentConnectionStrings,
        $newConnectionStrings
    )
    $connectionStrings = @{}

    # Setting the config requires a Hastable. Then generates a hastable of the current connection strings and adds/updates the new one
    foreach ($c in $currentConnectionStrings) {
        $connectionStrings[$c.Name] =
            @{
                Value = $c.ConnectionString;
                Type = ($c.Type | Out-String).ToUpper()
            }
    }
    foreach ($n in $newConnectionStrings) {
        $connectionStrings[$n.Name] =
            @{
                Value = $n.ConnectionString;
                Type = ($n.Type | Out-String).ToUpper()
            }
    }

    return $connectionStrings
}
Examples of this function being used looks like this:
# Build out the new connection strings
$newCS = @(
    @{
        Name = "ConnectionString1";
        Value = "LongConnectionString";
        Type = "Sql";
    },
    @{
        Name = "ConnectionString1";
        Value = "LongConnectionString";
        Type = "Sql";
    }
)
# Get the current connection strings so we don't get rid of ones that already exists
$currentConnectionStrings = (Get-AzWebApp -ResourceGroupName "rg" -Name "WebAppName").SiteConfig.ConnectionStrings

# Use the function to combine/overwrite the connection strings and return them in a way Azure can understand
$newConnectionStrings = Add-ConnectionStrings -currentConnectionStrings $currentConnectionStrings -newConnectionStrings $newCS

# Actually update the connection strings on the Web App
Set-AzWebApp -ResourceGroupName "rg" -Name "WebAppName" -ConnectionStrings $newConnectionStrings
For security, its important you do not save your connection strings in plaintext to disk. You should store these connection strings in an Azure Key Vault or other safe place, or grab them on the fly and only use them in memory.
My company recently had a penetration test and part of the findings was the fact we had insecure cipher suites. I was the lucky one tasked with removing old cipher suites and TLS versions.
I fired up IISCrypto on my secondary Windows Server 2022 Domain Controller, built out a IISCrypto plan, applied, tested it and exported it as a reg file. Then I powered up Group Policy Manager and created a GPO to disable the old cipher suites. I was nervous doing this, but I knew we only used Server 2016, 2019, 2022, and Windows 10/11, so I didn’t expect many issues since they are all mostly new. And if I did have an issue, all I would have to do is open IISCrypto and revert the changes on things that broke.
First, I applied to the GPO to workstations. All of which are Windows 10 and Windows 11. As I’m sure you know, these changes don’t take effect until after a reboot, so it was a quiet few days. But after the weekend updates applied, that’s when things heated up.
The first report was SQL Server 2019 AND SQL Server 2022 was unable to log in, even locally. When they attempted to login, they got the simple sounding error “Internal connection fatal error. Error state: 15, Token : 23 (System.Data)”
The next report was the fact that a basic Remote Desktop (RDP) would fail when connecting into a device that the GPO has been applied to. It would display the error “An internal error has occurred”.
None of these error messages was helpful. The thing that really blew my mind was that Windows Server 2016 did not have an issue at all. Windows Server 2022/Windows 11 didn’t either. But Server 2019 and Windows 10 did. Why would Server 2016 be fine but 2019 fail when telling it to use more modern cipher suites?
As soon as a developer complained that their local SQL instance didn’t work, I thought don’t worry, I got this. I powered up IISCrypto on their PC and hit server defaults and rebooted. And… It did not fix it. I tried selecting EVERYTHING! Nothing would work.
After MANY MANY hours trying to figure out why developers with Windows 10 kept getting errors, I still could not find the cause. It wasn’t until I started going line by line in the registry file wondering why the changes wasn’t reverting with IISCrypto.
Then it CLICKED! Windows 10 and Server 2019 does NOT support TLS 1.3. Not at all. IISCrypto KNEW that. So when I told IISCrypto to revert changes, it knew Server 2019/2016 didn’t support TLS 1.3, so it didn’t attempt to revert that. It left the reg key for TLS 1.3 in place. So now Windows 10/Server 2019 thinks it supported TLS 1.3, when in reality it doesn’t. When it tried to negotiate the encryption, it said “I support TLS 1.3″ and so did the other side. So they tried to speak in TLS 1.3, but the RDP/SQL server couldn’t walk the walk. Instead, it failed with ‘Internal error”.
After removing the TLS 1.3 registry change, rebooted, everything worked perfectly.
Long story short, DO NOT use a server 2022/Windows 11 IISCrpyto Reg file on Windows Server 2019 or Windows 10. If you did, REVERT THAT REGISTRY CHANGE NOW!!
The real question I have – why does Server 2019 break down, while 2016 does not? Its like Server 2019 is only partially aware of TLS 1.3 while Server 2016 just ignores it. Sounds like a bug to me!
I hope this saves you the many hours I spent trying to find the answer! I saw where several other people asked and there never was an answer. Let me know if this helps you! Below is the error messages we were getting:
===================================

Cannot connect to localhost.

===================================

Internal connection fatal error. Error state: 15, Token : 23 (System.Data)

------------------------------
Program Location:

   at System.Data.SqlClient.TdsParser.TryRun(RunBehavior runBehavior, SqlCommand cmdHandler, SqlDataReader dataStream, BulkCopySimpleResultSet bulkCopyHandler, TdsParserStateObject stateObj, Boolean& dataReady)
   at System.Data.SqlClient.TdsParser.Run(RunBehavior runBehavior, SqlCommand cmdHandler, SqlDataReader dataStream, BulkCopySimpleResultSet bulkCopyHandler, TdsParserStateObject stateObj)
   at System.Data.SqlClient.SqlInternalConnectionTds.CompleteLogin(Boolean enlistOK)
   at System.Data.SqlClient.SqlInternalConnectionTds.AttemptOneLogin(ServerInfo serverInfo, String newPassword, SecureString newSecurePassword, Boolean ignoreSniOpenTimeout, TimeoutTimer timeout, Boolean withFailover, Boolean isFirstTransparentAttempt, Boolean disableTnir)
   at System.Data.SqlClient.SqlInternalConnectionTds.LoginNoFailover(ServerInfo serverInfo, String newPassword, SecureString newSecurePassword, Boolean redirectedUserInstance, SqlConnectionString connectionOptions, SqlCredential credential, TimeoutTimer timeout)
   at System.Data.SqlClient.SqlInternalConnectionTds.OpenLoginEnlist(TimeoutTimer timeout, SqlConnectionString connectionOptions, SqlCredential credential, String newPassword, SecureString newSecurePassword, Boolean redirectedUserInstance)
   at System.Data.SqlClient.SqlInternalConnectionTds..ctor(DbConnectionPoolIdentity identity, SqlConnectionString connectionOptions, SqlCredential credential, Object providerInfo, String newPassword, SecureString newSecurePassword, Boolean redirectedUserInstance, SqlConnectionString userConnectionOptions, SessionData reconnectSessionData, DbConnectionPool pool, String accessToken, Boolean applyTransientFaultHandling, SqlAuthenticationProviderManager sqlAuthProviderManager)
   at System.Data.SqlClient.SqlConnectionFactory.CreateConnection(DbConnectionOptions options, DbConnectionPoolKey poolKey, Object poolGroupProviderInfo, DbConnectionPool pool, DbConnection owningConnection, DbConnectionOptions userOptions)
   at System.Data.ProviderBase.DbConnectionFactory.CreateNonPooledConnection(DbConnection owningConnection, DbConnectionPoolGroup poolGroup, DbConnectionOptions userOptions)
   at System.Data.ProviderBase.DbConnectionFactory.TryGetConnection(DbConnection owningConnection, TaskCompletionSource`1 retry, DbConnectionOptions userOptions, DbConnectionInternal oldConnection, DbConnectionInternal& connection)
   at System.Data.ProviderBase.DbConnectionInternal.TryOpenConnectionInternal(DbConnection outerConnection, DbConnectionFactory connectionFactory, TaskCompletionSource`1 retry, DbConnectionOptions userOptions)
   at System.Data.ProviderBase.DbConnectionClosed.TryOpenConnection(DbConnection outerConnection, DbConnectionFactory connectionFactory, TaskCompletionSource`1 retry, DbConnectionOptions userOptions)
   at System.Data.SqlClient.SqlConnection.TryOpenInner(TaskCompletionSource`1 retry)
   at System.Data.SqlClient.SqlConnection.TryOpen(TaskCompletionSource`1 retry)
   at System.Data.SqlClient.SqlConnection.Open()
   at Microsoft.SqlServer.Management.SqlStudio.Explorer.ObjectExplorerService.ValidateConnection(UIConnectionInfo ci, IServerType server)
   at Microsoft.SqlServer.Management.UI.ConnectionDlg.Connector.ConnectionThreadUser()
Our company has been using Cloud Services (classic) for some time now and I was tasked with migrating our application to Azure Web Apps. Our company used a MSI to install the New Relic agent as part of the Cloud Services startup. When we switched to Web Apps, I setup our Azure Web Apps to install the New Relic extension. What I did not know at the time was the fact that when you create a staging slot using the PowerShell command New-AzWebAppSlot, extensions are not carried over.
I had to devise a way for our deployment process to be able to create a new staging slot and still be able to install New Relic before swapping slots. Turns out, this is not documented very well by Microsoft or anyone really at the time of writing this.
Below are the methods I use to install new relic (or any extension) on an Azure Web app. If you are trying to install New Relic – the extension name is “NewRelic.Azure.WebSites.Extension”. If you are looking for the name of another extension, I have provided instructions on how to get that name below.
If you are trying to install the extension on a slot (such as a staging slot), use this command. I could not find a way to deploy to the production slot/staging slot using the same command. If you can find a way, please let me know in the comment section!
To find the extension name, we will use Kudo to get that!
Open the Azure Portal and navigate to your Web App
In the sidebar, click Advanced Tools and click Go. This should open a new Tab to the Kudo interface.
You should see a heading called REST API. Under there, you will find Site Extensions: installed | feed
If you have the app installed on this web ap, you can click installed and you will see the information for just what you have installed. If you do not have it installed, you can click feed and see all the installable extensions that the Azure Portal lets you install.
You should now see JSON data for the extensions. Find your extension and look for its id. The ID is what you need to put into the above PowerShell command (without the extra quotes.
I can remember back when I first signed into the Azure portal. It was very overwhelming. I didn’t know where to click to even begin. Azure has changed a lot since then and still takes a lot of patience to learn, but once you get started it just kind of clicks.
When you’re starting to learn azure, one of the most important things is to have some great resources to use to get started! Having the right learning materials when you first sign into Azure can make a huge difference in your experience.
As tempting as it is to start learning the really fun stuff like AI, Cognitive services, Machine Learning, and other Azure services, you probably should start with learning the slightly more boring stuff first – Azure Infrastructure as a Service. These are things like Azure Networking, Azure Virtual Machines, and Azure Storage. Once you have these things down, you will have a much better understanding of the Azure basics. You will understand how Azure pieces things together and breaks things apart.
Below I am going to list some great resources for learning the very basics of Azure.
MoreAbout.Tech – Obviously this site in the Azure category would be my first stop 🙂
Pluralsight – Azure Fundamentals – If you haven’t heard of it, Pluralsight is a GREAT place to learn. It does cost some upfront, but they do usually offer a free trial. They have MANY courses on Azure and even courses specific to different sections of Azure. I would recommend starting with their Azure Fundamentals course.
Microsoft Learn – Azure Fundamentals – This is where I would recommend starting. Its a link to a certification test, but if you scroll down to Ways to prepare and click Self-paced, Microsoft links to several great learning paths where you can get started. It also even gives you a free lab environment. You can spin up resources and it doesn’t cost you anything at all! And at the end you can even try for the certification exam. The test was super easy, back when I took it, it was more on the theories of cloud computing rather than the specifics of Azure.
Azure Documentation – although not the best place to start with, this is by far one of the best places to learn once you understand the basics.
Azure for Student – If you can prove you are a student at a school or college, you can get free Azure credit and some of their most popular services for free. I would definitely sign up for this if you qualify!
Hands on experience is best! There are several ways to get hands on experience:
Use Microsoft Learn modules that offer a lab experience. These are free!
If you company has a MSDN license available, ask for one. This gives you $50 for free every month!
If your a student, you can get free credit
Ask you company if they use Azure. If so, ask for a walk around in Azure. Not only will this get you experience, but it will get you in with the Azure people. You could ask for some side duties if your company is open to cross training.
If you want to manage your Windows 11 devices centrally and apply security policies, group policies, and other settings, you need to join them to an Active Directory domain. In this blog post, I will show you how to join a Windows 11 computer to an on-premises Active Directory domain using different methods.
Requirements and Preparations
Before you join your Windows 11 computer to a domain, you need to meet some basic requirements and make some preparations:
Your computer must have a Pro, Education, Pro for Workstations, or Enterprise edition of Windows 11. Home editions do not support domain join. However, you can purchase a Home to Pro upgrade license.
Your computer must be connected to a local network and be able to access at least one domain controller. You can check the network connectivity and DNS settings of your computer by using the ipconfig /all command in PowerShell or Command Prompt.
Your computer must be able to resolve the domain name and ping the domain controller. For example, if your domain name is woshub.loc, you can use the command ping woshub.loc to test the name resolution and network connectivity.
Your computer’s local time must be within five minutes of the domain controller’s time. This is required for Kerberos authentication. You can check the time settings of your computer by using the Get-Date command in PowerShell or the date and time commands in Command Prompt.
Your computer must have a unique and meaningful name that will be used in the domain. You can change the computer name by using the classic Control Panel (sysdm.cpl) or PowerShell (Rename-Computer -NewName "wks-tst1"). You need to restart your computer after changing the name.
You must have a user account with delegated administrative permissions to join computers to the domain. This can be a regular user account (by default, any domain user can join up to 10 devices) or a privileged domain administrator account.
Joining Windows 11 to a Domain Using System Properties
The classic way of joining a Windows computer to a domain is by using the System Properties dialog box. Here are the steps:
Open Control Panel and click on System and Security > System.
Click on Change settings under Computer name, domain, and workgroup settings.
Click on Change under To rename this computer or change its domain or workgroup, click Change.
Select Domain under Member of and enter your domain name (e.g., woshub.loc).
Click OK and enter your user name and password when prompted.
Click OK again when you see the message Welcome to the woshub.loc domain.
Restart your computer.
Joining Windows 11 to a Domain Using Settings App
Another way of joining a Windows 11 computer to a domain is by using the Settings app. Here are the steps:
Open Settings and click on Accounts > Access work or school > Connect.
Click on Join this device to a local Active Directory domain under Advanced options.
Enter your domain name (e.g., woshub.loc) and click Next.
Enter your user name and password when prompted and click OK.
Click Next when you see the message Welcome to the woshub.loc domain.
Restart your computer.
Joining Windows 11 to a Domain Using PowerShell
You can also join a Windows 11 computer to a domain using PowerShell commands. Here are the steps:
Open PowerShell as an administrator.
Use the Add-Computer cmdlet to join your computer to the domain. For example:
This command will prompt you for the password of the administrator account and then join your computer to the woshub.loc domain and restart it.
Alternatively, you can use the Join-Domain cmdlet from the ActiveDirectory module (you need to install it first by using Install-WindowsFeature RSAT-AD-PowerShell). For example:
Today, I wanted to apply some Group Policy settings to users who login to certain computers in an OU. More specifically, I wanted to create a Scheduled Task for users who log into servers. I have found in my research that this is technically called Loopback Processing of Group Policy. Using this feature of Group Policies, you can apply a User based GPO to users who log into applied computers.
The first thing I did was build out my Group Policy like I wanted, just like a normal GPO. I created some Scheduled Tasks that would run as the user and would be created when they login.
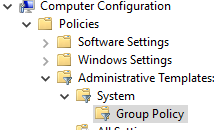
Next, I turned on the setting that applied the GPO to Users as well. Navigate to Computer Configuration – Policies – Administrative Templates – System – Group Policy.
Screenshot of Group Policy GPO folder filtered
From within there, you will find the policy labeled: Configure user Group Policy loopback processing mode. Set that setting to enabled. Below is the Help Section of the group policy setting. Here is a link to the related Microsoft article. You may want to do more research before you turn this setting on, as I only tested it in my Home Lab. It could have more far-reaching changes that I am unaware of.
A screenshot of the GPO item Configure user Group Policy loopback processing mode
This policy setting directs the system to apply the set of Group Policy objects for the computer to any user who logs on to a computer affected by this setting. It is intended for special-use computers, such as those in public places, laboratories, and classrooms, where you must modify the user setting based on the computer that is being used.
By default, the user’s Group Policy Objects determine which user settings apply. If this setting is enabled, then, when a user logs on to this computer, the computer’s Group Policy Objects determine which set of Group Policy Objects applies.
If you enable this setting, you can select one of the following modes from the Mode box:
“Replace” indicates that the user settings defined in the computer’s Group Policy Objects replace the user settings normally applied to the user.
“Merge” indicates that the user settings defined in the computer’s Group Policy Objects and the user settings normally applied to the user are combined. If the settings conflict, the user settings in the computer’s Group Policy Objects take precedence over the user’s normal settings.
If you disable this setting or do not configure it, the user’s Group Policy Objects determines which user settings apply.
Note: This setting is effective only when both the computer account and the user account are in at least Windows 2000 domains.
I had to do some troubleshooting on our ADFS (Active Directory Federation Service) servers today and I noticed the Event Viewer was completely full of hundreds of these messages every minute:
An exception occurred while enqueueing a message in the target queue. Error: 15517, State: 1. Cannot execute as the database principal because the principal “dbo” does not exist, this type of principal cannot be impersonated, or you do not have permission.
There was so many of these messages, I couldn’t see anything else and it was taking too long to filter. So I did a little bit of research on this and with my SQL DBA background, I was able to figure it out. My knowledge of ADFS is limited and this fix worked in our environment but every environment is different, so make sure it will work in your environment too before following this!
The issue is the fact that when ADFS tries to connect to the WID (Windows Internal Database) for ADFS, the user is tied to DBO for the DB. But when the DB Owner is no longer valid, you will get the impersonation error and will no longer be able to connect. Most likely (this is just my assumption for my environment) ADFS was setup a long time ago by a different user that no longer exists. Which then invalidated the owner of the DB. All that needs to be done is change the DB ownership – instantly without a reboot or service restart, it resolved the error messages in my environment and had to be done to each ADFS server.
Many other sites says to install the full SSMS, but this can require reboots and no updates pending, etc. That is actually not necessary if you use PowerShell. If you dont already have it installed for one reason or another, install PowerShell SQL commands:
Run PowerShell ISE (PowerShell will work, I just prefer ISE) AS ADMINISTRATOR. Run this command (be sure its cool with your security team you install this or follow any steps below):
Install-Module sqlserver
After installing the SQLserver module, if you want, you can verify if this is the issue by using the below command.
Invoke-SQLcmd -ServerInstance "np:\.\pipe\MICROSOFT##WID\tsql\query" -Query "select name,owner_sid from sys.databases"
After running the command, if SA does own the DBs (meaning this is NOT your issue) you should see all {1, 0, 0, 0…} in the owner_sid rows. If you see something other than {1, 0, 0, 0…} in all columns like the screenshot below, then you COULD be effected by this (its possible the owner is still a valid user)
To change the owner of the DBs, runs these two commands.
Invoke-SQLcmd -ServerInstance "np:\\.\pipe\MICROSOFT##WID\tsql\query" -Query "ALTER AUTHORIZATION ON DATABASE::[AdfsArtifactStore] TO [sa]"
Invoke-SQLcmd -ServerInstance "np:\\.\pipe\MICROSOFT##WID\tsql\query" -Query "ALTER AUTHORIZATION ON DATABASE::[AdfsConfiguration] TO [sa]"
After running those commands, you should no longer see any new events in the error log.
I hope this helps you! Please let me know if it does in the comments below!
I have been eyeballing MDBootstrap Pro for a couple years now, and ran into this. I noticed that MDBootstrap was having a promotion where if you used their coupon code, you get 6% off your total. So I just wanted to share it in case you was considering buying it!
T6UR9RVQ
Please consider using my affiliate link so I can make a small commission (at no cost to you) for sharing this coupon with you!
A powerful and free UI KIT for the newest Bootstrap 4 and Material Design
500 material UI elements, 600+ material icons, 77 CSS animations, Sass files, templates, tutorials and many more. Free for personal and commercial use.
Trusted by 1,500,000+ developers & designers. It’s used by companies like Nike, Samsung, Amazon, Ikea, and Sony.
Most important features:
Lots of tutorials
Fully responsive
Plenty of useful templates
Easy installation
Easy to use and customize
Active community
Dedicated support forum
Detailed documentation
Available in jQuery, Angular, React and Vue versions
I recently setup Sophos XG Firewall in my Home Lab and setup vlans, firewall rules, DHCP relays to point to my Windows DHCP Server, etc. The whole 9 yards. After I had everything working, I decided to add in the rest of my VLANS and create relays so they all worked without a hitch. After doing this, something that should not have effected other already working VLANs, nothing was getting DHCP addresses. Not even ones that was working.
I spent MANY hours trying to figure out why. I tried changing all of my firewall rules to any-any, etc. Nothing was working. After looing in the logs, I noticed this:
I was getting a block by the firewall rule 0 on Appliance Access as Denied. But why? A – it shouldn’t be a firewall rule blocking it because I put in an Any-Any rule. I tried changing everything. But it came down to one.. simple.. thing.. Here is my setup so you can understand the issue.
The Setup
VLAN 110 – 192.168.0.0/24 – Networking equipment
Sophos XG Firewall – IP 192.168.0.5
VLAN 111 – 192.168.1.0/24 – Servers
Windows AD/DNS/DHCP Server – 192.168.1.10
VLAN 112 – 192.168.2.0/24 Clients (No IP address)
Laptop
Cellphone
In Sophos, Windows DHCP, I setup DHCP subnets for all three vlans. Then in Sophos, I setup a DHCP relay just the Clients VLAN.
It worked! I was getting IP addresses assigned to the Clients.
The Issue
Then I decided to setup VLANs for every subnet and made quite a few other changes to get it to that perfect lab I was hoping for. I looked up and noticed all my Chromecasts was saying they couldn’t get an IP. I checked and sure enough, it was no longer dishing out IP addresses.
The Resolution
After much trial and error, I found that the fact I put a DHCP relay on the subnet the DHCP server was on, it was causing all the DHCP requests to fail.
Someone may have a better understanding of it and can explain better in the comments, but what my assumption is, when the DHCP request goes out, it gets blasted to the entire vlan to find a DHCP server by blasting out to port 67/68 UDP in search of a DHCP server. The gateway at 192.168.2.1 forwards this to the 192.168.1.0/24 vlan and it receives the blast on that subnet for the response, and blasts that back out to the requesting vlan.
If you put in a DHCP relay on the same subet as the DHCP server, then when it tries to “blast” the response back, the gateway takes that requests and tries to re-blast it in the same subnet. This causes a malformed loop and causes the request to fail. Thus removing the DHCP relay on the VLAN the DHCP server is in should fix this.
Please let me know if you have a better understanding of the cause or if this helps you!
I have been wanting a smart watch for the last year or two, but one of the biggest reasons I waited till now to get one is because I could not decide which one I wanted. I had it narrowed down between a Samsung Galaxy Watch (46mm) and a Fossil Gen 4 Explorist. But there was a couple features from each one that made it stick out.
There are major differences between the watches and each one had a few of my requirements in what I wanted from a watch, but neither had them all. So I just had to choose which one was worth the most to me.